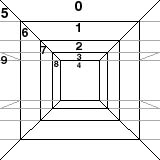
Fig 37: 10 wall views defined for each wall
Walls are the most sophisticated elements of a new adventure, and adding new walls should only be attempted by more advanced DB2ACK users. In this chapter, we will create a new town wall that is a combination of the generic brick building (wall 7) with the extended roof of the dwelling (wall 49) to create a new variation wall so that you can add more color to your town maps.
All walls are defined by individual "wall.txt" data files that reside in your DB2ACK/Adventures/MyAdventure/Walls directory. There you will find three subdirectories separating walls that were designed for the outdoors, towns, and dungeons. Each of these wall files is composed of a few fields to describe some attributes (described in detail in the wall section of the documentation) of the wall followed by a set of "views" which must be constructed for each of the 10 possible angles you can view a wall. Only front views, left views, and far-left views are defined in a wall.txt file; all right, and far-right views are automatically constructed by the DB2 engine at run-time by horizontally fliipping the left walls. Figure 37 shows the 10 wall views (numbered 0-9) that are defined in each wall file.
Each view contained in these wall files must be constructed from a set of "brushes", or individual bitmap graphics. It takes some patience and practice to be able to work out the (x,y) coordinates for each brush contained in a view so that when the engine draws them, they all line up seamlessly. And it also takes some practice to define, for each brush, what clipping, if any, must be done for each brush. A brush is "clipped" if you choose to define a sub-region of the graphic. Each brush in a view is defined by the following row of data:
#brush#         x,  y,  sx,  sy,  ex,  ey,  H,  V
34              12  12  0    0    255  255  0   0
The first field is the brush number, referenced from DB2ACK/Adventures/MyAdventure/lists/brushes256.txtto the end of all three of the brushes.txt files so as not to interfere with the ordering of existing brushes. The next two fields are the (x,y) coordinates that the brush will be drawn within the given wall. Note that these coordinates are always relative to the top-left corner of the brush, not the top-left corner of the screen. The next four parameters define the starting (sx, sy) and ending (ex, ey) offsets with which to clip the brush. They are optional, and if you want to draw the entire brush, you can just use 0 as the starting coordinate and 255 as the ending coordinate. Never use other coordinates out of the bounds of the size of the brush. The last two parameters are flags indicate whether to horizontally and/or vertically flip the brush before clipping and drawing it.
We will illustrate the use of the brush drawing parameter here on the "magic mouth" brush".
    #brush#         x,  y,  sx,  sy,  ex,  ey,  H,  V
    34              12  12  0    0    255  255  0   0

    #brush#         x,  y,  sx,  sy,  ex,  ey,  H,  V
    34              12  12  0    0    255  255  1   0

    #brush#         x,  y,  sx,  sy,  ex,  ey,  H,  V
    34              12  12  0    0    255  255  1   1

    #brush#         x,  y,  sx,  sy,  ex,  ey,  H,  V
    34              12  12  16   16   48   48   1   1

In the last chapter, we uncommented the first section of each of the three pdb files so that a walls database is generated each time we run mkpdbs. However, the only reason we did that was so that the mkpdbs program would have some palette data when it went on to compile the tiles databse. Presently, the walls database that we are creating (but not using) is called Walls256SampleAdv.pdb (likewise for 4, 16 gray versions), because that is the name left over from when we copied the pdb config files from the Sample Adventure directory.
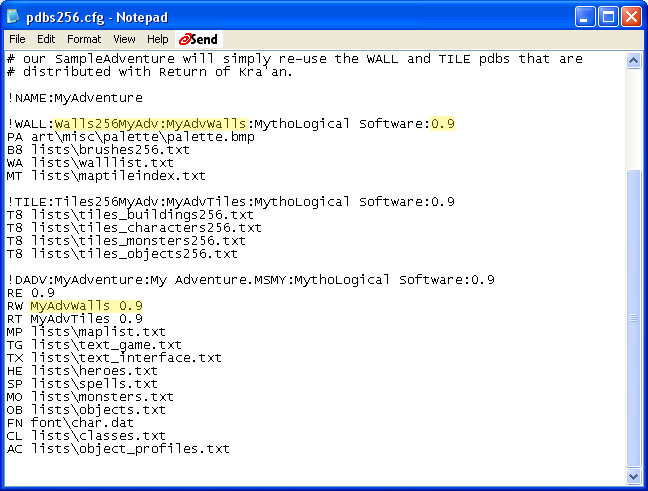
In this step, we are simply going to change the name of this walls database file to "Walls256MyAdv.pdb" (likewise for Walls4MyAdv.pdb, Walls16MyAdv.pdb). We are also changing the database's name to "MyAdvWalls" in the !WALL section and changing the wall data file referenced by the MyAdventure section to the new "MyAdvWalls" database name. For each of the three pdb config files in the DB2ACK/Adventures/MyAdventure, make edits as per Figure 38, below.
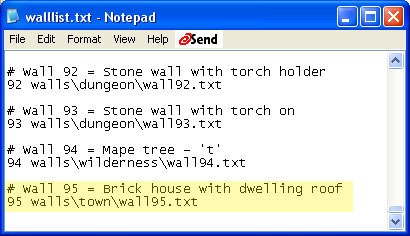
Open the file DB2ACK/Adventures/MyAdventure/lists/walllist.txt. This file contains a list of all the individual wall description files that are compiled into the walls database by mkpdbs. The data format is simple. Each non-comment line represents a wall ID and a path to it's wall description file.
Scroll to the bottom and add the following entry:
# Wall 95 = Brick house with dwelling roof
95 walls\town\wall95.txt
Note that wall files are stored in one of three directories (town, dungeon, wilderness) under the DB2ACK/Adventures/MyAdventure/Walls directory.
In this step, we will create the file, wall95.txt referenced in the last step. Open your text editor and create a new document in the directory DB2ACK/Adventures/MyAdventure/Walls/town called walls95.txt.
Each wall file must start with the two header lines like:
WALLNAME: "brick dwelling"
#twostory Visible, Occludes, Blocks Symmetric Base buildng empty Char maptiles
    0        1         1       1       1       7     0      1      d    312 312 312 312
The first line specifies the wall name, as it will appear in the mapeditor. The second line specifies a series of attributes for the wall, described in detail in the walls section of the documentation. Many of these attributes also appear in the mapeditor's current or draw wall section of the interface.
For now, the only important field to discuss is the "Base" attribute for which we give a value of 7. This field can have a value 0-7. A value of 0 means there is no "base wall" for the current wall. A value of 1-7 means that the DB2 engine should draw all the brushes contained in the corresponding views of the given base wall before drawing the walls in the current wall. The reason for this field is to help save storage space for enumerating all the brushes over and over again for certain walls that share many features. In this case, our new brick building with a dwelling roof happens to share all the same brushes as wall #7, the generic brick building. So instead of re-specifying all of wall#7's brushes in this wall, we will simply give this wall a base of 7, and then later, we will only have to list the dwelling roof brushes that will be drawn on top.
Next, we will be defining the 10 views for the current wall. Each view consists of a number on it's own line indicating the number of brushes in that view, followed by that many rows listing the actual brushes and their drawing parameters. The order that views are defined, are the same as in Figure 37, above. First comes view #0 which is how the wall looks when standing on top of it. Typically, this view is only used for the force field wall where you can actually see the force field you're standing in. So in this case, the view has 0 brushes.
The next view is view #1 which represents your party standing right in front of the wall, looking straight at it. For this view, we need to add two brushes. The first brush is brush ID #200, as referenced in DB2ACK/Adventures/MyAdventure/lists/brushes256.txt. Brush #200 is defined to be: DB2ACK/Adventures/MyAdventure/art/walls/town/side/Finished256/dwelling1.bmp.

The second brush is just the same brush #200, but horizontally flipped. Add teh following lines to fill out the first two views. Note that the (x,y) coordinates for the first brush of view "Front 1" is (0, 0) which is always the top-left corner of the wall.
#Front 0
0

#Front 1
2
#Filename,      x,  y,  sx,  sy,  ex,  ey,  H,  V
200             0   0   0    0    255  255  0   0
200            60   0   0    0    255  255  1   0
Doing the same for the next two front views, we get
#Front 2: Number of brushes
2
#Filename,      x,  y,  sx,  sy,  ex,  ey,  H,  V
201             0   0   0    0    255  255  0   0
201            40   0   0    0    255  255  1   0

#Front 3: Number of brushes
2
#Filename,      x,  y,  sx,  sy,  ex,  ey,  H,  V
202             0   0   0    0    255  255  0   0
202            28   0   0    0    255  255  1   0
However, for the next view, it gets tricky because the brush #203 (Fig 39) is not simply a roof that can be drawn on top of the underlying brick wall. Brush 203 was drawn with the entire half of the dwelling wall, with both the roof part and house part. So what we want to do for this view is only use the top part of the brushes. To do this, we can specify an "ey" value for where we want the DB2 engine to stop drawing, as below:

#Front 4: Number of brushes
2
#Filename,      x,  y,  sx,  sy,  ex,  ey,  H,  V
203             0   0   0    0    255  16   0   0
203            20   0   0    0    255  16   1   0
Next comes the definition for the 4 left views, as in Fig 37, above, followed by the final view, the "far-left" view #9. For those views, we will be using brushes #204 - 211, which are all stored in the directory: DB2ACK/Adventures/MyAdventure/art/walls/town/side/Finished256.
## Side walls ##############################################################

#Left 0: Number of brushes
2
#Filename,      x,  y,  sx,  sy,  ex,  ey,  H,  V
204             0 124   0    0    0    0    0   0
211             0  23   0    0    255  255  0   0

#Left 1: Number of brushes
2
#Filename,      x,  y,  sx,  sy,  ex,  ey,  H,  V
205             0  10   0    0    255  255  0   0
208             0  89   0    0    255  255  0   0

#Left 2: Number of brushes
2
#Filename,      x,  y,  sx,  sy,  ex,  ey,  H,  V
206             0   7   0    0    255  255  0   0
207             0  58   0    0    255  255  0   0

#Left 3: Number of brushes
1
#Filename,      x,  y,  sx,  sy,  ex,  ey,  H,  V
209             0   4   0    0    255  255  0   0


## Far left wall ###########################################################

#Far-left (depth 3): Number of brushes
1
#Filename,      x,  y,  sx,  sy,  ex,  ey,  H,  V
210             0   7   0    0    255  255  0   0
This step is left as an exercise. You will need to edit a map, and change any existing wall to our new wall #95. After saving your changes to your map, run mkpdbs again, then test your changes. Make sure that before you test, you must install both the new MyAdventure.pdb (which contains your map changes) as well as the new Walls256MyAdv.pdb file. Figure 40 shows teh final wall as it appears in the game.