Load sample1.map into the mapeditor
In this step, we are going to introduce you to the mapeditor program used to create and edit maps. Each map in your adventure is saved as a separate ".map" file in your DB2ACK/Adventures/MyAdventure/maps directory. The "mapeditor.exe" program was installed in your DB2ACK/Tools/Windows" directory and can be run from the shortcut created by the DB2ACK installer under the start menu. In this section, we are going to first show you some of the basic functionality of the map editor, and use the mapeditor to make one tiny change to the SAMPLE 1 map in My Adventure.
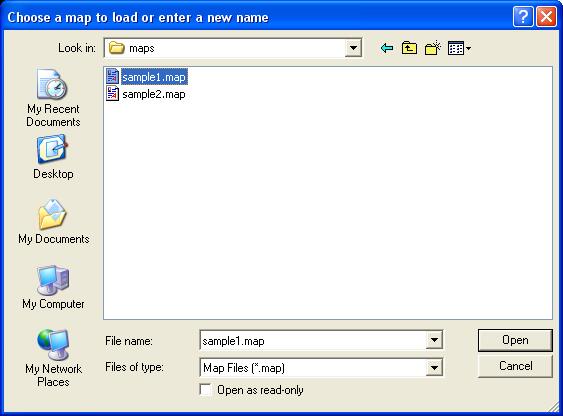
1) Load SAMPLE 1 map into mapeditor programUnder the Windows "Start" button, select "Programs" -> "DB2ACK" -> "Mapeditor". A file requester should appear, prompting you for either an existing map file to edit, or a new map filename to create. In this case, we want to edit SAMPLE 1 so navigate the path to your DB2ACK/Adventures/MyAdventure/Maps directory, and select "sample1.map", as in Figure 15, and hit "OK".
The mapeditor window should appear with "SAMPLE 1" at the top as in Figure 16.
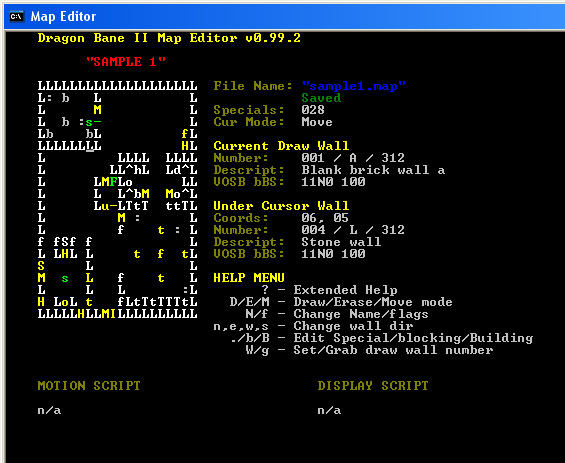
You will first notice that the mapeditor window is divided into four corners. We will briefly describe the four sections of the screen but refer you to the mapeditor section of the documentation for more details.
For now, you only need to learn a few very simple commands. Do not modify the map yet, but review these commands for the next step:
In this step, we are going to modify a generic stone walls at location (0,10). Note that your cursor's coordinates are listed under the "Under Cursor Wall" section. Using the cursor keys, move your underline cursor to square (0, 10). You should see that the "Under Cursor Wall" at that position is described as wall #4, or a "Stone wall". This description information all comes from a wall description file that you can edit, but is beyond the scope of this tutorial.
Change the wall under the cursor to wall #40 "Stone wall with scratch". Remember that you can change the wall under the cursor using the '-' and '=' keys. Note that a complete list of all the walls can be found in the wall list page.
4) Change the direction that the scratch is facing from the North face to the East face.Note that the "Under Cursor Wall" displays a funny string of characters for each wall: "VOSB bBS: 11N4 100". The left half of this string represent the first letter of several fields of information associated with this wall number. For example, the first letter, 'V' indicates whether or not the wall is visible. On the right half, the corresponding first value is '1' meaning that this wall is visible. The second letter, 'O' indicates whether the current wall "occludes", and it's value of '1' for this wall means that you cannot see through this wall.
The third letter, 'S', indicates the symmetry of the wall. Some walls look the same from any direction such as a rock, tree, generic brick wall, or hut. In those cases, you do not have to worry about this field. But for walls that don't look the same from every direction (such as a wall with an inlet or scratch), you need to indicate which direction looks different. In this case, we want the scratch to appear on the right (or East) side of the wall. Presently, the wall's "S" value is 'N', meaning that the scratch is on the North face of the wall. To change this, press the lower case 'e' key, and you should see the field update to indicate that the scratch is only visible on the East side of the wall.
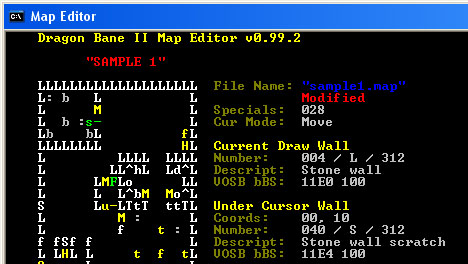
Note that after you modified the map, the red "Modified" flag appeared, indicating that you have unsaved changes. To save your map, press the uppercase "S" key, and to exit the mapeditor program press the Escape key.
6) Compile your changes with mkpdbs, install the new version of MyAdventure.pdb, and test the changes.Note that when editing maps, you do not have to delete any old save games or temporary save games before testing your changes because no map data is stored by the Dragon Bane II engine in savegame databases on your device. However, if you add or delete an entire map, or change the size of a map, you will need to delete your save games.
Walk over to the square you changed and notice the attractive scratch that you added to the wall.
Congratulations! You now know how to go about changing walls in maps. In the next section, we are going to create a new map from scratch, add that map to My Adventure, and create a simple teleport from SAMPLE 1 to the new map. The next section will provide you with some more mapeditor skills, and introduce you to mapspecial code. Click here.