Specify name for new map
In this chapter, we are going to create a new map, edit the map, add it to "My Adventure", and then create a teleport square from the first map to the new map. In order to create the teleport square, we will be describing the interface within the mapeditor program used to edit special code for a particular square, but will not go into too much detail about the actual instructions used in these scripts.
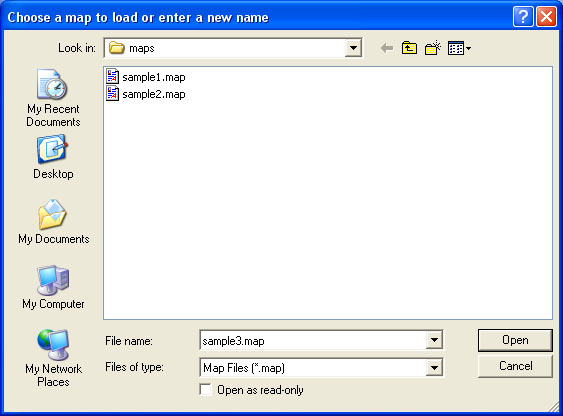
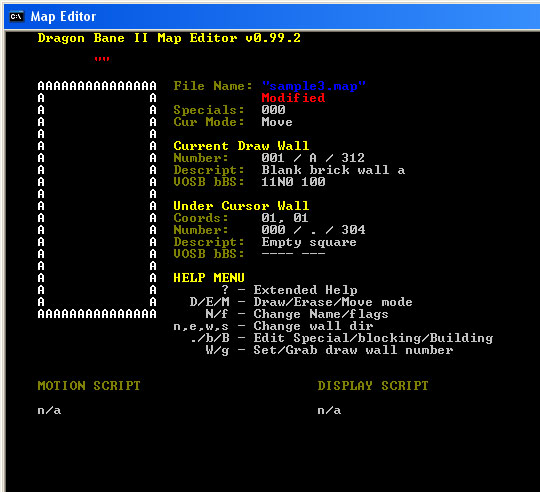
1) Create a new mapRun the mapedit program as before, by going to the Start menu, and selecting Programs -> DB2ACK -> Mapeditor. When the file requester appears, navigate to the DB2ACK/Adventures/MyAdventure/maps directory, and you should see your existing two maps listed. In the "File Name:" field, enter our new map name, "sample3.map", as in Figure 18, below.
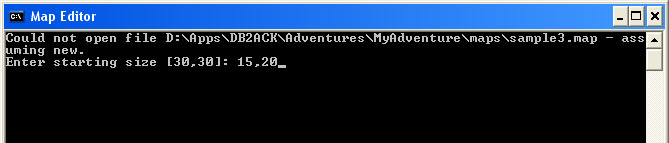
Click the "Open" button to dismiss the file requester, and the mapeditor console window benieth it will ask you for the dimensions of your new map. You may enter "15,20" to get a map that is 15 wide and 20 high, as in Figure 19.
.
After entering the dimensions of your new map, the mapeditor window should open with the new map, as in Figure 19, below. Note that the map is empty except for a border of generic brick walls (wall #1).
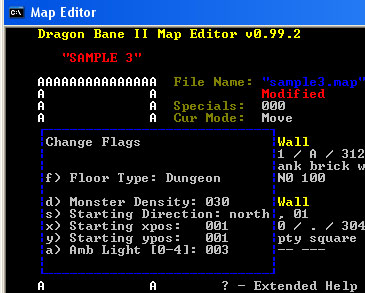
There are a few new commands you need to learn when editing a new map.
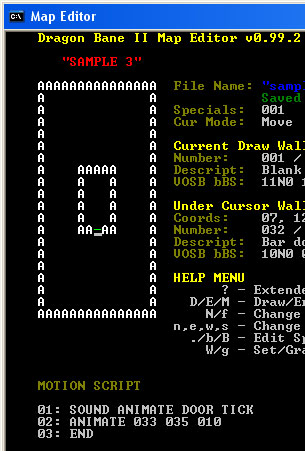
Before pressing escape, your changes should look like this:
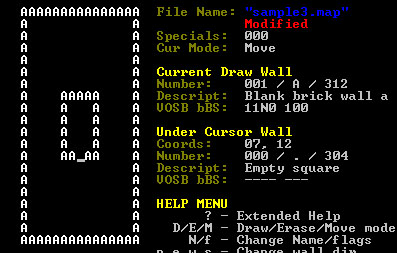
This room will be the target of your teleportaion from "SAMPLE 1" map. It is okay to use the current, default draw wall, wall #1 to draw this room. The corners of the room should be: (5,7), (9,7), (5,12), (9,12), with an opening for a door at (7,12). To draw the room, move your cursor along the wall and use the lowercase 'x' key to place a wall, and spacebar to remove a wall. When done, your map should look like Figure 22.
All doors are programmed in the mapeditor -- there is no special door command or wall. This way, the behavior of a door can be anything you want: it can always be locked or unlocked, it can require a key or button press or some other mechanism to unlock it, or it can even be drawn always 3/4 shut, or use special graphics or play special animations when it opens. Here, we just want a simple bar door that opens vertically and is always unlocked. The behavior of the door is that when you bump into it, it will play an opening door animation before allowing you to move onto the door's square.
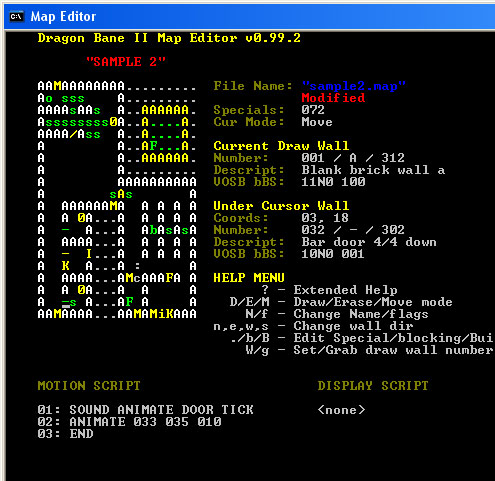
But rather than describe the details of the wall and its special instructions used to program the door opening mechanism, we are going to show you how to use a shortcut to copy and paste a generic unlocked door from another map. The mapeditor actually provides powerful copy and paste mechanisms. You can "copy" a map square including all of its flags and mapspecial code to a named variable, 'a' .. 'z', and then paste those named walls anywhere on the map. You can even paste between maps. The mapeditor also provides a single region buffer that can be used to copy rectangular regions between maps. So to complete this step, we are going to do a simple copy and paste from SAMPLE 2 map to SAMPLE 3 map as follows:
Now that we have copied the wall to the 'd' buffer, you can exit mapeditor by pressing the escape key.
Next, run mapeditor again, and open sample3.map. Move your cursor to the opening in the room at (7,12), and press lowercase 'v' (paste) and then lowercase 'd' (paste the 'd' buffer). You should see the green door character appear on your map as in Fig 24.
Save and exit the mapeditor. Copying and pasting walls not only makes map editing easy and less prone to human error, but it can be very helpful when you want to learn how to program a specific type of square that is available in one of the "Sample Adventure" maps (who's complete list of mapspecials is provided here. You can store up to 26 separate named wall buffers in letters 'a'..'z' plus a map region buffer described in the mapeditor documentation. One thing to watch out for when copying and pasting between maps is that you cannot have two or more mapeditor windows open at the same time when copying walls to named buffers. Only the first mapeditor window opened is able to write to these buffers, so attempting to copy a square from the second mapeditor window will fail. It is best to only have one mapeditor window open at a time when doing this type of editing.
5) Add your new map to the "My Adventure" map list.In order for your new map file, sample3.map to be included in "My Adventure", you need to add that file to the maplist.txt file in your DB2ACK/Adventures/MyAdventure/lists directory. Open that maplist.txt file in a text editor, scroll to the bottom, and add the following line:
2 maps\sample3.map
After doing so, your maplist.txt file should look like this:
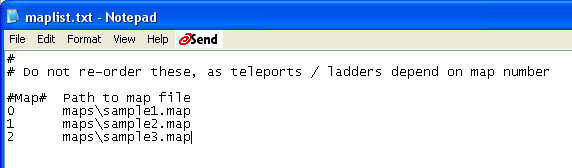
Save and exit your text editor. Next time you compile your adventure data with the mkpdbs program, it will compile your new sample3.map into your MyAdventure.pdb data file.
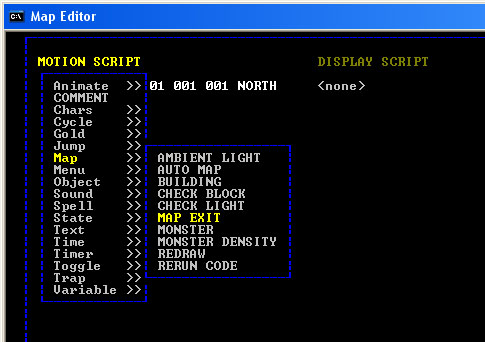
6) Create a teleport square from SAMPLE 1 to SAMPLE 3The only way to travel between maps is when the party steps on a square that executes a "MAP EXIT" instruction in its "MOTION CODE". It doesn't matter what wall is at that square: it could be a force field wall, an empty square, or even a tree. The teleport we will create will actually have a force field wall to help you identify it in the game. However, rather than copying and pasting from an existing teleport sqare, we are going to create a new teleport wall from scratch using the mapeditor's special code editing features. But first, you need to place a force field wall in SAMPLE 1 map that will be the source of the teleport.
At this point, we have created a force field wall, now it is time to add instructions to that wall to teleport the party. But first, it is necessary to learn a few simple instructions for editing mapspecial code. Don't do it just yet, but to edit a MOTION SCRIPT or DISPLAY SCRIPT for the wall under your cursor, you will press the period key, '.'. This will open a new window and places your cursor at the first line of the MOTION SCRIPT. In this script editor, the following keys may be used:
Using the above commands as a reference it should be easy to create a MOTION SCRIPT that is executed just before your party attempts to step into the force field that teleports the party to your new map as follows:
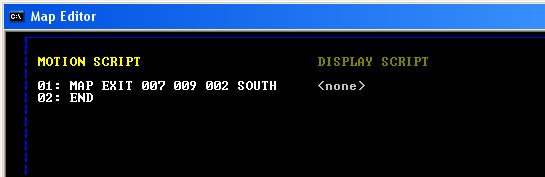
Save and exit from the mapeditor.
7) Create another teleport from SAMPLE 3 back to SAMPLE 1.This details of this step is left as an exercise. Create another teleport square in sample3.map, anywhere you like, and have it teleport somewhere back to sample1.map. You may use a different wall for your teleport square in sample3.map, if you like.
8) Compile your changes with mkpdbs, install the new version of MyAdventure.pdb, and test the changes.Now, because you added a whole new map, you need to delete any old save games or temporary save games before testing your changes.
Walk over to your teleport square and step through and observe on the overhead map that you have teleported to your new map.