Locked door script
In the last chapter, we introduced you to the mapeditor's script editing interface, and walked through an example of creating a simple, one line teleport square script. In the mapeditor chapter of the regular documentation there is a good tutorial showing how to create a chest with a key. In this chapter, we will demonstrate the creation of a more sophisticated scenario. In the room in our new SAMPLE 3 map, we will change the simple door to require a key. The person who has the key lives in a little hut nearby. Once you get the key from him, the hut will disappear. Unfortunately, the hut will be blocked by a series of deadly traps, but next to one of those traps is a fake wall concealing a fountain of health to help you get through the rest of the traps. So if you don't find the fountain of healing on your way to the hut, you may be killed by the traps leading to the hut.
This puzzle requires you to edit several squares on the sample3.map: the door will now require a key, a square next to the door will have a keyhole, a hut square will have a guy selling a key, 4 trap squares will block your path to the hut, a fake wall will conceal a hidden fountain, and the fountain square will heal your party when you bump into it. For each square, we will provide a step that illustrates the change in the map and provides detailed comments for each mapspecial instruction. But if you need help using the mapeditor interface to edit a square or edit the mapspecial instructions, please refer to the previous chapter.
State bitsBefore we proceed, it is important to understand the concept of "state bits". A state bit is a 1-bit value (either a 0 or 1) that stores the state of something in your adventure. There are two kinds of state bits: each map has it's own set of 64 local state bits numbered 0..63 that are only accessible while the party is on the given map; and all maps share a set of 64 global state bits in the range 64..127 that are available all the time on any map.
All state bits (global, and all sets of local state bits) are saved in every save game slot so that the savegame can "remember" the state of everything in the game. A state bit is required whenever something in a map changes in the game. For example, if you have a locked door, that door square requires you to allocate one local state bit to store wheather the door is locked (0) or unlocked (1). The assignment of the meaning of 0 and 1 to locked and unlocked is arbitrary, however all state bits in all maps are automatically initialized to have a value of 0 when a new game is started, so it is easier to write the script for a locked door if we assume that the door's initial locked state is the same as it's initial state bit value of 0.
As another example, suppose you want to create a treasure chest with a key. And suppose that you want the chest to be the nasty kind that may have a booby-trap, not the innocuous type that just automatically gives out its treasures for free. In this case, you will need two state bits, both local, because nothing outside the current map needs to check the condition of the chest. One bit will be used to indicate whether the party has disarmed the chest. A second bit will be required to indicate whether the object inside has been taken. The reason we cannot just automatically give out the object when the chest is disarmed and avoid using the second state bit is because you must always keep in mind boundary cases in your code: what if the party's inventory is full? If it is, you will want the game to remember that the chest is disarmed (first state bit) and remember that the object is still in the chest so that when the party returns, it can claim the treasure. When the object is actually successfully given to the party, the second state bit will be set to 1.
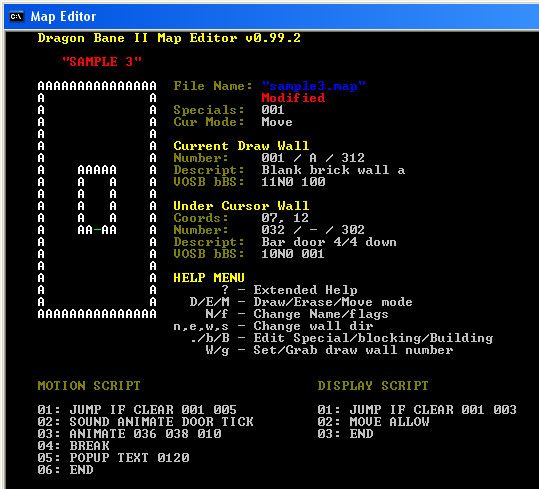
1) Load SAMPLE 3 map into mapeditor programThe MOVE SCRIPT gets executed just before the party attempts to step into the square. For this locked door square, the MOVE SCRIPT should check whether the door is locked or unlocked. If locked, it should display a popup message, and if it's unlocked, it should display the door opening animation.
120 TEXT_LOCKED "DOOR IS LOCKED."
The DISPLAY SCRIPT gets executed every time you view the given wall. Typically, the display script is used to change the appearance of a wall, but it can also be used to change the blocking attribute of a wall or display a "trap is near" warning message. For this locked door square, the display script should check whether the door is locked or unlocked. If locked, it should do nothing, but if unlocked, it should make the wall non-blocking so that you can walk through the wall.
Before pressing Escape to quit the script editor for this square, double check your script, especially the parameter values. The Mapeditor automatically changes your line number parameters as you add and remove instructions, so make sure that the parameters match the proper line numbers, as in Figure 30, below. Remember, pressing the "Enter" key at any line allows you to edit the parameters for that instruction.
Next to the locked door, create a keyhole wall:
Next, press the '.' key to open the script editing window for the keyholw wall. We will add a MOTION SCRIPT on the keyhole wall so that when you bump into it, it checks to see if the door is still locked, and if it is, it checks to see if your party has the right key.
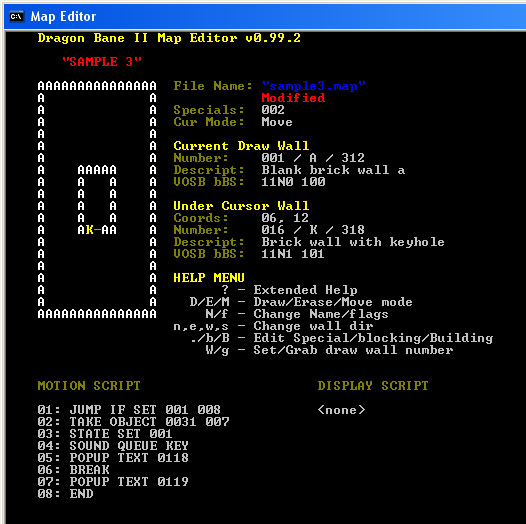
Double check the jump targets in your code to make sure that the script editor did not change them to something bad, while you were editing. There is no display script because we do not need to change the appearance or attributes of the wall itself. Press Escape to quit the script editing window.
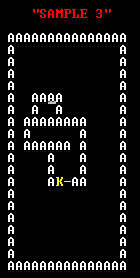
4) Create walls for puzzle sectionUsing the current draw wall, wall #1, redraw the shape of the room to look like Figure 32, below, to make room for the traps, hut, and fountain. Then go ahead and place the following walls to complete the puzzle:
Add secret wall
Add fountain wall:
        01: TRAP MAGIC 156 UNAVOIDABLE 000
        02: POPUP TEXT 0075
        03: END
The TRAP MAGIC instruction casts the spell given as the first parameter. The spell given may be almost any non-combat spell. Spell #156 is described in DB2ACK/Adventures/MyAdventure/lists/spells.txt as the TREAT PARTY spell that heals your party. The UNAVOIDABLE parameter means that this spell will always be cast, regardless of whether your party has cast the levitation spell (which would otherwise avoid an AVOIDABLE trap). The POPUP TEXT instruction displays a short text message given by the first parameter until the user dismisses it by taking any action. In this case, the message printed is "AH! REFRESHING!".
Add one trap square:
        01: TRAP PHYS ALL 008 AVOIDABLE
        02: END
The TRAP PHYS ALL instruction gives damage to everyone in your party, including any elemental, if present, so this instruction gives 8 damage to everyone in the player's party. Press escape when done editing this wall's special code.
Add other trap squares:
Add hut:
In the last step of creating the puzzle, we are going to add a motion and display script for the hut. But first, we need to create some text strings for the hut's menu and dialog so that we can later reference that text in our script. Keep your mapedit window open, but also open DB2ACK/Adventures/MyAdventure/lists/text_game.txt in your text editor, scroll to the bottom, and add the new text items, as in Figure 33.

Save your changes in the text editor and switch back to the mapeditor. In the hut, we are going to display a menu that allows you to talk to the person or exit. If you choose to talk, the person asks for an unspecified sum of money in exchange for a key. If you offer less than 20 gold, he thanks you. If you offer 20 or higher, he thanks you and gives you the key, and then the entire hut disappears forever. The graphic "tile" that will be displayed in the hut is tile #43. There are many graphic tiles in the game, grouped into several lists in the DB2ACK/Adventures/MyAdventure/lists directory. The list containing tiles of characters and NPC (non-player characters) that are available in the "Return of Kra'an" tile pdb that "My Adventure" re-uses is called Tiles_characters256.txt (for the 256 color version of the tiles). There are also lists of tiles for monsters, buildings, and objects. For more information on graphic tiles, see the documentation section on graphics data.
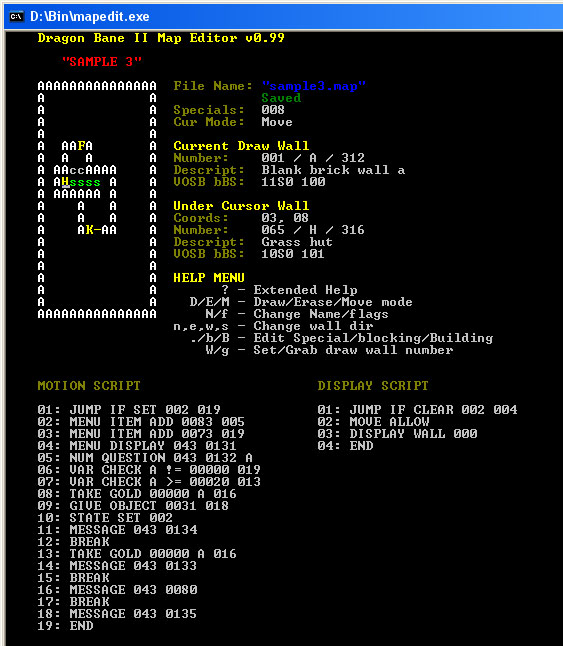
Now that we know what graphic tile to display in the hut, and what text will be used, we are ready to create the script. The script will use one state bit, state bit #2 to store whether the key has been given yet or not. The rest of the script proceeds according to the following flow diagram. Press the '.' key to open the script editor and create the following MOTION and DISPLAY scripts:
        MOTION SCRIPT:

        // If state #2 = 1 jump to line 19, otherwise continue execution
        // on the next line
    01: JUMP IF SET 002 019
        // Use up to 5 "MENU ITEM ADD" instructions to setup a menu.  Each
        // instruction takes a text message number to display for the menu
        // item and a line to jump to if the user selects that menu item
        // Add menu item for (TALK) option
    02: MENU ITEM ADD 0083 005
        // Add menu item for (EXIT) option
    03: MENU ITEM ADD 0073 019
        // MENU DISPLAY switches to quarter screen mode and displays the
        // given tile number and text message header, and then draws all
        // previously declared MENU ITEM's.
    04: MENU DISPLAY 043 0131
        // User has selected (TALK) option given on line 2.  The NUM QUESTION
        // instruction puts the game in party view mode again, displays the
        // tile given in the first parameter, the text given in the second
        // parameter, and waits for the user to enter a number which is stored
        // in the variable named as the third parameter.
    05: NUM QUESTION 043 0132 A
        // If user entered non-zero amount, then continue.  Otherwise, if
        // user entered 0 gold, so goto end of script
    06: VAR CHECK A != 00000 019
        // User entered gold amount that is too small, so jump to section of
        // script that handles this case.
    07: VAR CHECK A >= 00020 013
        // User entered a gold amount that is sufficient to purchase the key.
        // The TAKE GOLD instruction attempts to take the gold given by
        // the sum of the second and third parameters (0 + A) from the party.
        // If the party has enough gold, execution continues, otherwise, no
        // gold is taken, and the instruction jumps to the line number given
        // as the last parameter, in this case, line 16.
    08: TAKE GOLD 00000 A 016
        // Gold was successfully taken from party, so this instruction attempts
        // to give the object # specified by the second parameter to the party.
        // If successful, the object is given and execution continues.  If
        // the party doesn't have room in their inventory, the instruction
        // jumps to line 18 to handle that case later in the script
    09: GIVE OBJECT 0031 018
        // We have taken the gold and successfully given over the key, so now
        // it is time to set state #2 = 1, to record this fact so that next
        // time the user steps on this square, the script will just jump to
        // the end.
    10: STATE SET 002
        // The MESSAGE instruction puts the game in party mode, displays
        // the tile given as the first parameter in the top-left corner of the
        // screen, and displays a short text message given as the second
        // parameter in the top right, with a simple (OK) button to dismiss
        // the message.
    11: MESSAGE 043 0134
    12: BREAK
        // We get to this case from line 07, above, when the user attempts to
        // pay an amount that is too little.  Here, we handle the case by
        // attempting to take the amount of gold the user had offered, which
        // is stored in variable A.  If the party actually has enough to cover
        // the purchase, the gold is taken from the party and execution
        // continues, otherwise, the TAKE GOLD instruction jumps to line 17
    13: TAKE GOLD 00000 A 016
        // We have successfully taken the party's gold, but it wasn't enough
        // to purchase the key.  The MESSAGE instruction again sets the game
        // in Party mode and draws the tile number graphic given in parameter
        // one and displays the text message, "...NOT ENOUGH GOLD..." given
        // in parameter two.
    14: MESSAGE 043 0133
    15: BREAK
        // Get here from line 8 or line 13, as the result of attempting to
        // take more gold than the party has.  To handle this case, just
        // print a message in party view saying "THAT'S NOT ENOUGH GOLD..."
    16: MESSAGE 043 0080
    17: BREAK
        // Get here from line 9, as the result of attempting to give an
        // object to the party, but not having enough room.   Handle this
        // case by printing the message saying "...NOT ENOUGH ROOM..."
    18: MESSAGE 043 0135
    19: END

        DISPLAY SCRIPT:

        // By default, state bit #2 is clear meaning that we have not gotten
        // the key yet.  If that is the case, jump to the end of the script.
    01: JUMP IF CLEAR 002 004
        // If we have gotten the key, then we are going to get rid of the
        // hut at this square by first changing the square from blocking to
        // non-blocking
    02: MOVE ALLOW
        // And second, change the wall number at this square from a hut to
        // become Wall #0 (an empty square)
    03: DISPLAY WALL 000
    04: END
Your completed puzzle, with the hut script should look like Figure 35. Be sure to double check all the jump targets in your code to make sure they land on the right lines. Then save and exit your mapeditor and text editor programs.
In this case, there is no need to delete any temporary save games because we did not add maps or change the dimensions of a map. Note that to test this puzzle, you will have to: (a) Go to the ATM machine in town (at 9,18) to get some gold and (b) be careful about stepping through the deadly traps, otherwise you'll get killed.
The mapeditor allows you to create very sophisticated scenarios. To learn more, we recommend studying the list of instructions carefully as well as the examples provided in the sample adventure.
Congratulations! You now know how to go about creating more sophisticated puzzles in the mapeditor. In the next section, we will show how to add your own tile graphics to your adventure so that you don't have to rely on the set provided in the Sample Adventure.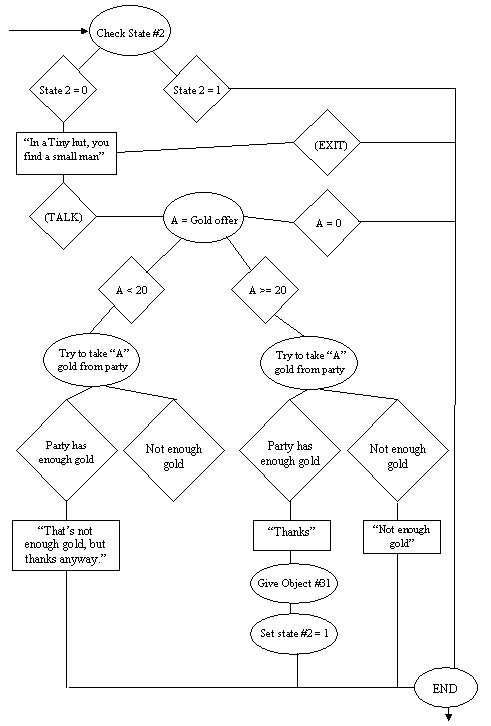